Infographic: Low Carb Guru Guide
The low-carb universe is much more diverse than many dieters realize. Everyone wants to lose fat and be more healthy overall, but the specific recommendations can vary a lot from one low-carb guru to another.
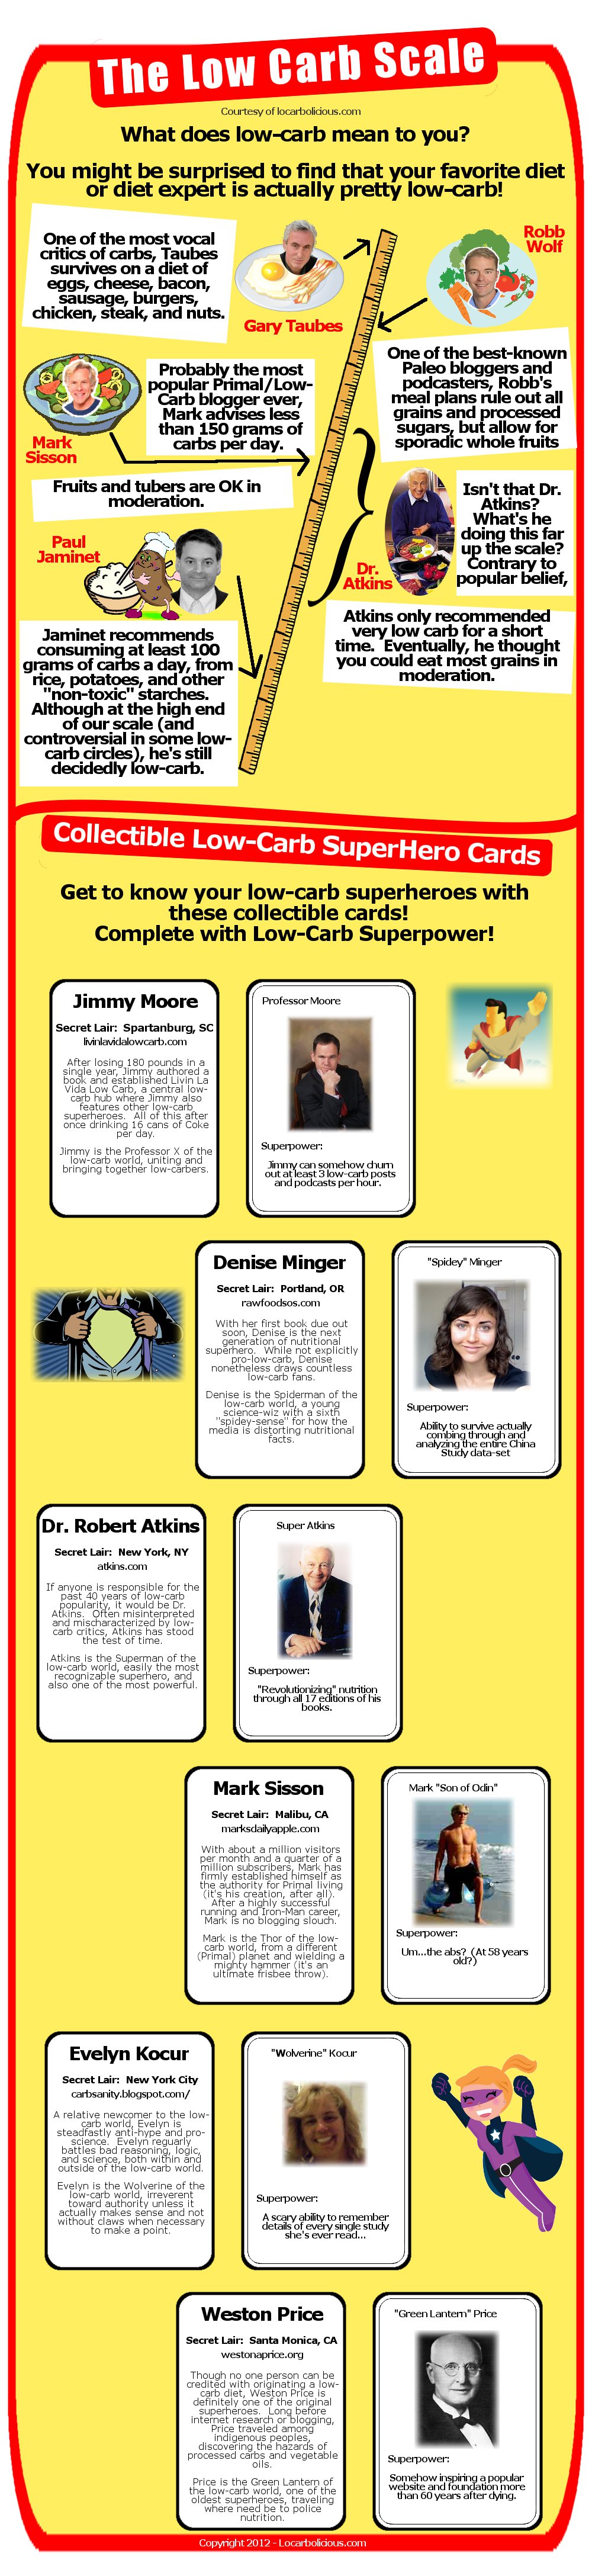
Here is an infographic that I put together featuring some of my favorite “Low-Carb Superheroes.” (I obviously couldn’t include everyone). This is my first foray into the land of infographics, so let me know what you think in the comments below! Oh, and if you click on the infographic, a larger version will come up.

Rosemary Thyme Roasted Vegetables Recipe
This is very healthy vegetable dish that tastes delicious and is easy to make. I modified it from a allrecipes.com recipe. You can change the sweet potato to an eggplant or some mushrooms if you want to lower the carbs.

| Rosemary Thyme Roasted Vegetables Recipe |
Recipe Type: Side Dish
Author:
Prep time: 20 mins
Cook time: 35 mins
Total time: 55 mins
Serves: 4
A delicious and very simple roasted vegetables side dish with fresh herbs.
Ingredients
- 2 yellow squash, cubed
- 2 red bell peppers, seeded and cubed
- 1 sweet potato, peeled and cubed
- 1 tablespoon fresh thyme, chopped
- 2 tablespoons fresh rosemary, chopped
- 1/4 cup olive oil
- 2 tablespoons red wine vinegar
- salt and pepper to taste
Instructions
- Preheat oven to 475F.
- Mix together in a small bowl the thyme, rosemary, olive oil, red wine vinegar, and salt and pepper.
- In a large bowl, mix together all the vegetables with the mixture, so that all the vegetable pieces are well coated with the mixture.
- Place in casserole dish and bake for 35-40 minutes or until the vegetables start turning brown. Stir every 10 minutes to prevent the vegetables from sticking to the casserole dish.
Calories: 138 Fat: 7 Saturated fat: 1 Carbohydrates: 15 Sugar: 10 Fiber: 4 Protein: 3 Cholesterol: 0
Exercising – Hard Core Push Ups
How to do push ups without injuring your shoulders
Why I became interested in “Military-Style”
Push-Ups:
I grew up playing badminton, first at home with my parents and then more often and competitively in both high school and college. I only ever received coaching and training at an older age, which meant that I wasn’t particularly good at badminton and also that my form wasn’t very good. Over time, my bad form led to me developing shoulder injuries, mainly tendinitis in the rotator cuff of my right shoulder.
I gave up playing a few years ago, but the pain and discomfort still linger in many activities. I’ve tried Active Release Therapy with my local chiropractor (after reading about it in Tim Ferriss’ book, “4 Hour Body”), and the therapy (along with a cortisone shot) has definitely helped calm down the injury. After a year of pretty much doing nothing with my shoulder, the pain has subsided, and I have almost normal range of motion. However, the pain still comes back if I do certain exercises.
In particular, push ups give me problems – and no wonder since normal push ups often injure rotator cuffs in people without prior shoulder injuries!
As an alternative, my chiropractor suggested that I try “military-style” push-ups, which I want to share with you so that more people don’t injure their shoulders while doing pushups. (In fact, my cross-fit instructor also suggested that everyone do these instead of normal push-ups.) These push-ups also have an added benefit – they’re harder than normal push-ups, mostly because they rely on your arm muscles more than your chest! In effect, you get less injury with more of a work out….
How to do Military Style Push Ups: I was going to write a very detailed explanation, but I found the video above (on YouTube), and it explains the movement about as well as I could hope to.
The key is to keep your elbows tucked in close to your side (rather than out at right angles to your body). Your hands are generally directly under your shoulders.
The first time I tried these push ups, I nearly collapsed from doing just 5, because I was so unused to working out that part of my arms, so don’t be afraid to start with your knees on the floor or even doing the push ups against a wall. Just remember to tuck your elbows into your side, and your rotator cuffs will thank you!