Moved to AncestralChef.com
I have moved to blogging at AncestralChef.com.
Please follow me there for more delicious recipes!! If you haven’t seen my new FREE iPad e-book, then check it out on your iPad here. You can also reach me on Twitter, Facebook, Pinterest, or Google+.
I am also featured in the first issue of Paleo Living Magazine for iPad (full of videos, interactivity, and gorgeous pictures!), and you can download the first issue for FREE here.
Baking Soda Vs. Baking Powder–Is There a Difference?
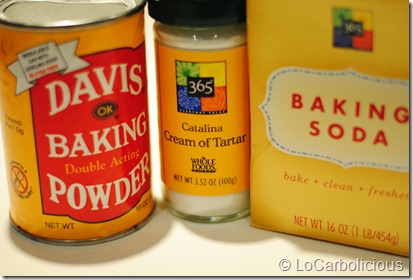 If you’ve ever baked normal (full of carbs) cookies, cakes, or breads, then you have probably used baking soda or baking powder. You might also have come across cream of tartar perhaps. These are all common ingredients that you can find in the baking section of most grocery stores. For a long time, I thought baking soda and baking powder were the same thing and could be used interchangeably. I don’t really know why I thought such a thing – but it does explain why I wasn’t particularly good at baking before!
What is Baking Powder? This is usually a combination of baking soda with an acidic agent (such as cream of tartar, which is described below) along with some other ingredients, such as cornstarch. Baking powder produces carbon dioxide bubbles, which expand in the oven (due to the heat) so that your baked goods will rise and become light and soft. Baking powder can come in two versions: single-acting and double-acting. Single-acting means that as soon as you add the powder to anything wet, it’ll start giving off carbon dioxide bubbles, so you’ll need to put your mixture into the oven quickly to avoid running out of bubbles. Double-acting means that although some of the bubbles are released when you first add the powder to your mixture, most of the bubbles will come out when the mixture heats up in the oven. Therefore, you don’t have to worry about leaving your mixture out for too long when it comes to double-acting powder.
Why is Baking Powder Problematic on a Low Carb Diet? Many low carb diets discourage cornstarch or any other type of starch, but this is unfortunately an ingredient in most brands of baking powder. The starch doesn’t actually add much to the cooking, but it does stop the baking powder from getting moist and clumping together. So, while the baking powder states that it contains less than 1g of carb, you should remember that its serving size is 1/8 of a teaspoon and most recipes call for at least a teaspoon or more (there are 2g of carbs per teaspoon of baking powder). If you’re not super strict on your low carb diet, then a teaspoon of baking powder is not going to be a problem. However, if you’re really counting every carb, then you can make your own starch-free low carb baking powder by using cream of tartar and baking soda combined. A simple recipe for making baking powder is below, but first let me briefly explain what baking soda and cream of tartar are.
What is Baking Soda? It’s 100% sodium bicarbonate, which reacts with anything acidic in your baking mixture to produce carbon dioxide bubbles. These bubbles will start forming as soon as the baking soda touches the acidic ingredients, so you need to bake your mixture fast (otherwise, the bubbles will die out).
What is cream of tartar? This is a white powder (potassium hydrogen tartrate) that is an acidic salt. It’s occurs naturally as one of the by-products of wine-making. It has many uses in foods, the most well-known of which is stabilizing beaten egg whites. Other uses include giving icing and meringue a creamy texture (hence its name I assume) and reducing discoloration of vegetables when boiled. For low carb dieters, it has another use. When added to baking soda, it makes a carb-less baking powder that works just as well as normal baking powder! There have been some health concerns about cream of tartar. First, it is high in potassium, which can be problematic for people with kidney disease or taking medications that prevent the kidney from getting rid of the potassium effectively. When taken in large amounts, cream of tartar can also be a laxative. However, the amount used in normal cooking is generally not a problem.
Low Carb Cookies – Peanut/Almond Butter Cookies that Don’t Crumble!
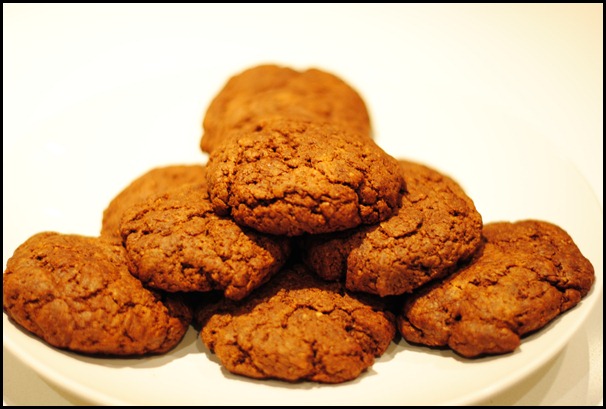
Yes, delicious low carb cookies do exist, and you are looking at a photo of them!!
I tried making low carb cookies several months ago but gave up after finding them to be too crumbly. However, my interest was piqued again this past week when my cafeteria served flourless (gluten free) peanut butter cookies. They were a sell-out! But, making a flourless cookie was only half the battle – I still needed to get rid of the sugar in the cookies. I’ve described my trial and error process below, but you’ll love the ending (I did)….
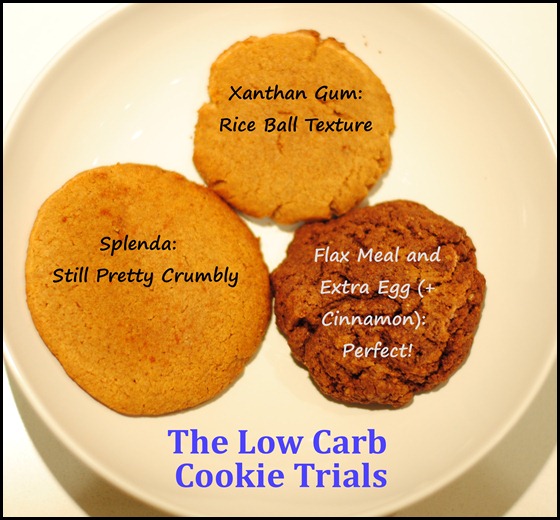
Crumbly Cookie: I looked up a simple flourless peanut butter cookie recipe, which was really simple: mix together 1 egg with 1 cup peanut butter and 1 cup sugar, and then bake for 10 minutes at 375F. I tried the simple substitution of liquid sucralose for sugar. The cookies came out delicious but incredibly crumbly – in fact, I could barely get the cookie to my mouth before it disintegrated into powder. The cookies were vanishing into dust, and I wasn’t even eating them!
Substitute Splenda For Sugar: Next, I tried using Splenda. Although I’m not usually a big fan of Splenda (because of the bulking agents it adds), my cookies were in dire need of some sort of bulking agent! The cookies came out less crumbly, but were still very dry and all-too-eager to break into pieces.
Xanthan Gum? I took some serious action after that by adding in some xanthan gum (which is a thickening agent that’s great in soups like egg drop soup). This made the cookies more coherent, but it also gave it a chewy texture – reminiscent of Japanese mochi or rice balls (both which are generally made from glutinous rice flour).
Eureka: I soon (after quite a few more batches!) realized that perhaps eggs could act as the glue in this recipe. But I couldn’t just add more eggs in – it would make the recipe way too liquidy. I had to add something in with the eggs. That’s when it came to me…flax meal. The xanthan gum went out and the flax meal and extra eggs came into the mixture. The cookies came out more solid, with a texture rather like oatmeal! Success at last.
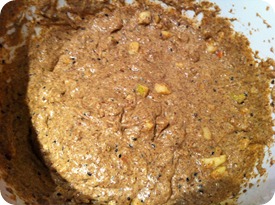
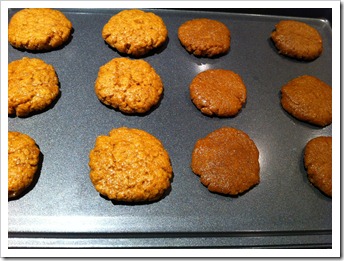 Making the Cookies Rise: Now that I had figured out how to make the cookies not crumble, I turned to the problem of making them rise. I wanted cookies that were lighter and less dense. Baking powder and baking soda are the common ingredients for making baked goods rise. To minimize usage of baking powder (because it contains a little bit of unnecessary carbs), I used cream of tartar instead. I’ll explain in my next post what all that means. Basically, I tried adding just baking soda (the cookies on the right), and then both baking soda and cream of tartar (on the left), and the cookies definitely rose more with both ingredients (even before putting it into the oven)! As you can see, cream of tartar also lightened the color of the cookie. (The photo shows the cookie dough prior to cooking.)
THE RECIPE
Ingredients (12 cookies):
-
1 cup peanut or almond butter (make sure it has no added sugar or salt or anything else!)
-
2 eggs
-
1 cup equivalent of Splenda
-
1/2 cup of flax meal
-
1/2 teaspoon baking soda
-
1 teaspoon cream of tartar
-
Optional: 2 tablespoons vanilla extract, 2 tablespoons of cinnamon, 1 teaspoon of nutmeg, 1/8 teaspoon of ground cloves (if you don’t really like the taste of nuts, then these will hide the nutty flavor well)
Directions:
-
Preheat oven to 375F.
-
Mix the dry ingredients (Splenda, flax meal, baking soda, and cream of tartar together).
-
Add the peanut/almond butter and the 2 eggs.
-
Shape into 1 and 1/2-inch balls and flatten into cookies.
-
Bake in oven for 8 minutes.
-
Leave to cool (they’ll harden a bit more upon cooling).
Note: the dough may look rather oily before you put it into the oven (and I think the cinnamon might draw some of the liquids out of the dough so that it looks like your dough is sitting in a puddle of water), but it comes out non-oily and moist on the inside!
Apple Cinnamon Muffins
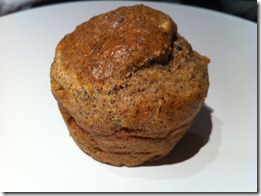 It would be wrong of me to go on about these delicious low carb muffins (gluten-free and grain-free) without giving you the recipe for them! So, it’s below… The muffins are 2g net carbs each and are really moist and full of flavors because of the spices and apple chunks in them. I keep them in the fridge and microwave one for 10 seconds on high to warm it up. They’re really convenient to take with you as breakfast or as a quick snack. You can try making them with other flavors, but I’ve generally found that apple and cinnamon go really well with artificial sweeteners (i.e. you can’t tell that it’s not real sugar!), whereas chocolate is really bad at hiding artificial sweeteners.
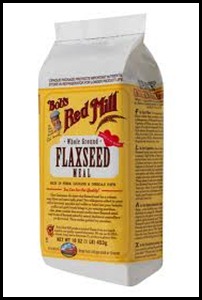
These muffins are flaxseed meal and almond meal based. You can either buy bags of flaxseed meal and almond meal (Wholefoods and a lot of larger grocery stores and health stores generally carry Bob’s Red Mill brand pictured below or you can buy it online at Amazon.com) or you can make your own by placing flaxseeds/almonds into a food processor or blender (the almonds can wear down the blade in your blender/food processor quickly). I generally make my own as it’s much cheaper to buy flaxseed and almonds unprocessed, but if you’re just starting to try low carb baking, then you might want to start with a small bag of flaxseed meal and of almond meal and see how you like the muffins before buying them in bulk. The other essential ingredient in low carb baking is coconut flour, and my next muffins post will on that!
Ingredients (makes 12 muffins)
- 1 cup of flax meal
- 1 cup of almond meal
- 1 tablespoon of black sesame seed (optional)
- 1 tablespoon of baking powder
- 1/4 teaspoon of salt
- 1 and 1/4 teaspoons of nutmeg
- 1 teaspoon of sugarfree vanilla extract
- 1 teaspoon of cinnamon
- 1 teaspoon of orange zest (optional)
- 1 cup equivalent of artificial sweetener
- 1/2 cup of butter, melted
- 4 eggs, beaten
- 1/3 cup of almond milk (can substitute water)
- 1 small apple, diced
Equipment: muffin/cupcake pan
Directions
- Preheat oven to 350F (175C).
- Grease muffin/cupcake pan with coconut oil or butter (ignore this step if you use muffin cups).
- Mix ingredients together and whisk well.
- Fill each muffin/cupcake cup to around 3/4 of the way.
- Bake for 20 minutes and cool before removing.
I’ve noticed that the muffins do shrink a bit once they cool, and they don’t look as fluffy as regular muffins, but they are deliciously moist even on reheating and much much healthier. In fact, I think these are better than many regular full carb muffins! Let me know what you think of the recipe and what variations you’ve tried.
Pulled Pork with Zero Carb BBQ Sauce
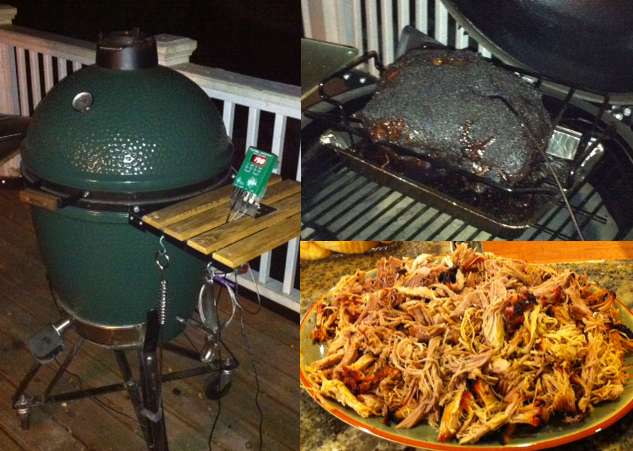
A Green Egg and the Delicious Pulled Pork that Came Out
I had pulled pork cooked in an green egg a few weeks ago at a friend’s house in Georgia. A green egg? It’s a high end ceramic charcoal cooker that keeps temperatures regulated throughout the cooking process and it’s shaped like a green egg (see photo). It tasted delicious, but unfortunately, the green egg costs over $1,000, requires a deck or balcony (which is impossible in NY), and takes 8 hours of monitoring. Instead of all that, I just use my handy slow-cooker. And what about the BBQ sauce? Aha – this is where it gets exciting…Zero-calorie delicious BBQ sauce – keep reading and all will be revealed.
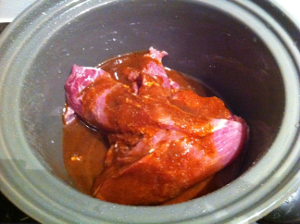 Instructions for Cooking the Pulled Pork:
- Get some pork butt or pork shoulder and place it into the slow cooker. (The photo shows 3lb of pork butt.)
- Pour some sea salt into the pot (2 tablespoon for 3lb).
- Add 1 cup water.
- Optional: add some garlic and onion powder and some of the zero-calorie zero-carb BBQ sauce (see below).
- Cook on low (300F) for 10-12 hours (it’s ready after around 8 hours, but I like it super tender).
- Shred using two forks.
Zero-carlorie, Zero-carb BBQ Sauce:
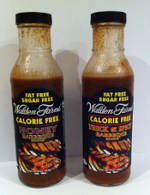 There are 2 incredible parts to this secret sauce:
FIRST, Walden Farms makes these amazing zero-calorie zero-carb dressings and sauces (and even a chocolate dip). You can buy it off Amazon for $3.99 plus shipping or at random little stores like the one on the corner of 9th Ave. and 36th St. without the shipping. There are 4 flavors, and I’ve tried 2 so far: Honey and Thick N’ Spicy. Ok, if you’re reading their reviews on Amazon or you’ve tried it, it’s not exactly amazing. The Thick ‘N Spicy is pretty good if you can handle a lot of spice. The Honey isn’t spicy, but you can taste the fake sugar in it. But, if you add the second part of this secret sauce, it transforms….
 SECOND, Crystal Hot Sauce, which you can buy from Amazon for $7.99 and free shipping. It may not sound that amazing, especially since the ingredients are so simple: Aged Red Cayenne Peppers, Distilled Vinegar, Salt. But, it is just that…amazing. It adds so much flavor without being too spicy. I love spicy food, but I can’t take huge amounts of spice, so this is perfect.
The trick is to combine the Crystal sauce with the Walden Farm Honey BBQ and then adding a touch of salt. The hot sauce flavor completely covers up the fake sugar taste in the BBQ sauce so that you’re simply left with a delicious sauce! Pour onto your pulled pork, or pulled chicken or whatever meat you want. Zero calories. Zero Carbs. I could write something very cheesy right now, but I’ll stop here.
Low Carb Ice Cream Part 1 – FAIL
Low carb desserts are definitely the weak link in the locarbolicious diet! And, unfortunately, my search for an edible low carb ice-cream has so far lead me nowhere. In fact, it’s really a disgrace to call the frozen foods that I’m going to describe below “ice-creams” because they bear so little resemblance in taste to them! If you don’t believe me, you’re welcome to go try them, but just remember that you’ve been warned! There’ll be a part 2 to this as I’ve got a few more ideas to try before giving up!
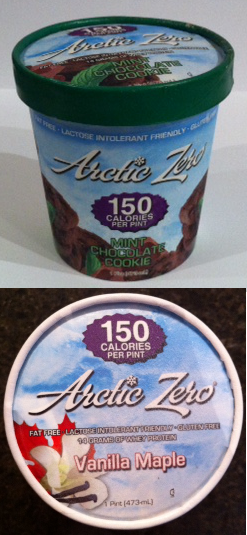 Arctic Zero: You know, they do such an amazing job of advertising their 150 calories per pint fake ice-cream, that I’ve actually been fooled twice into buying it! I somehow forgot just how awful it tasted after my first purchase (the mint chocolate cookie), and so when I saw it again in Wholefoods, I was fooled AGAIN (I bought the vanilla maple flavor that second time)! So, what is this Arctic Zero that’s able to fool me twice? It’s not ice-cream in any way (even though they call it an “ice-cream replacement”) – it has no milk or cream in the ingredients list. At best, it might be described as a bad sorbet perhaps. It’s true that their ingredients list looks pretty “natural,” but “natural” does not equal good tasting! On the contrary, their main ingredient is purified water (which, if you forgot, tastes like nothing). Their second most populous ingredient is whey protein concentrate, which also does not taste good (that’s why you have to flavor protein shakes so much!). Then comes a whole slew of sugars and flavorings, including organic cane sugar, chicory root, guar gum, xantham gum, natural flavors, sea salt, monk fruit concentrate. These are definitely not ingredients for the low carb purists! Ok, enough about the ingredients, the truth is I just care about whether it tastes good!
How does it taste? Because most of the pint is just frozen water, it doesn’t have the creaminess of ice-cream. Instead, it’s closer to ice, which presents a slight challenge when you’re trying to scoop it out. You could of course wait for it to melt a bit, but then it turns into a slushy frozen fudge-like consistency, which tastes even worse. I prefer the taste when this so called “ice-cream” is frozen because I can at least pretend that it’s just flavored ice or something! The mint flavor smells ok – mint + chocolate. The taste though, was just a watery mess. It was kind of minty and kind of maybe chocolatety and vaguely sweet. The vanilla maple was even worse – maybe vanilla and maple just doesn’t work well together, I don’t know, but all I can say was yuck!
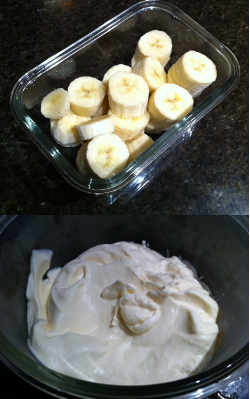 Bananas: You might have heard of this trick already, but after you put frozen bananas through the blender, they come out looking very much like creamy ice-cream. You can easily try this yourself by getting 2 bananas (you need enough bananas in the blender for it to have something to blend otherwise it doesn’t work) and chopping them up into half-inch chunks (as shown in the top picture). Place the chunks of bananas into the freezer overnight (it doesn’t work if the bananas are not well-frozen as I found out on my first attempt, which resulted in a disgusting gooey mess). Then place the frozen banana chunks into the blender and blend well for a few minutes – at first it looks like it’s just chopping the frozen bananas into smaller frozen chunks, but after a while, you’ll see the “ice-cream” form (see photo).
How does it taste? Like bananas (surprised?). It’s kind of creamy, but it’s not really creamy like full fat dairy ice-cream and it has a gooey texture when it melts in your mouth (not surprising since that’s the texture of banana puree). So maybe if you really like banana-flavored, not-so-creamy ice-cream, then this might work! Oh, and it’s not really low-carb since bananas have a lot of carbs. One medium sized banana (7″ to 7-7/8″ long) has 27g carbs (3g fibre and 14g sugar!). So, not a great choice!
Ok, don’t despair just yet as there are a few other options for low carb ice-creams out there. I’m going to try and get my hands on a tub of the Carbsmart Breyers Ice-cream (their website claims that Food Emporium carries one of the Carbsmart ice-creams). And then there’s also the trial and errors of home-made ice-cream. Part 2 coming soon… If you’ve tried a low carb ice-cream, please comment below to let me know what you thought of it.
Low Carb Pasta
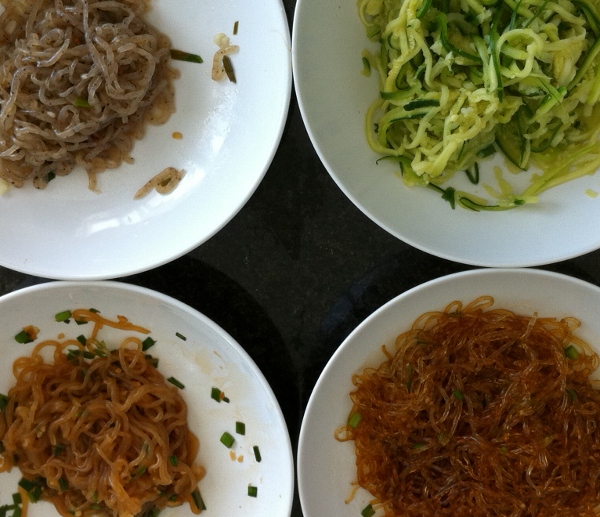
4 Great Low Carb Pasta/Noodles
It’s hard living without noodles and pasta, especially when instant ramen noodles and quick pasta dishes played such an important part of my college life! Here’s 4 noodles/pasta you can eat on a low carb diet – they all have practically no calories and no carbs (the 3rd and 4th noodles are different variations of each other)!
1. Zucchini Noodles Start with 3 zucchinis and a Julienne peeler (kinda like a potato peeler but it cuts everything into thin strands at the same time). Cut each zucchini in half lengthwise, place the flat side down onto your chopping board and start peeling away with the Julienne peeler. It’s easy to use – just pull down like in the photo. You end up with strands of zucchini noodles ready to cook.
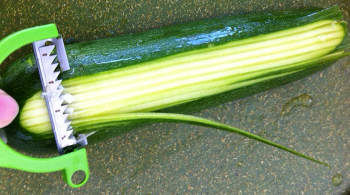
Making Zucchini Noodles using a Julienne Peeler
There are various ways of cooking the zucchini noodles. The easiest is to put a bit of olive oil into a frying pan. Add some minced garlic and chopped chives and then put in the zucchini noodles. Cook in the frying pan for a minute, add salt to taste, drain and serve. Out of the 4 noodles, these were definitely my favorite!
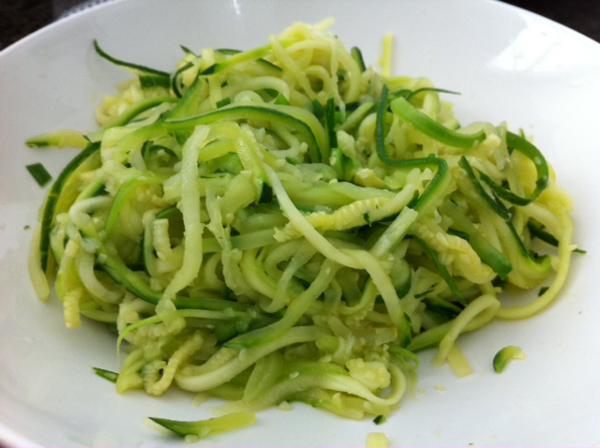
Zucchini Noodles Cooked with Olive Oil, Garlic and Chives
2. Kelp Noodles I picked up this packet of kelp noodles for $2.49 from my local Korean supermarket (H-Mart on 32nd St., New York). Kelps are large seaweeds according to Wikipedia – they’re fat-free, gluten-free, low-calorie (55 cals per 12oz pack, which can serve 2 people) and 0 net carbs (11g of fiber).
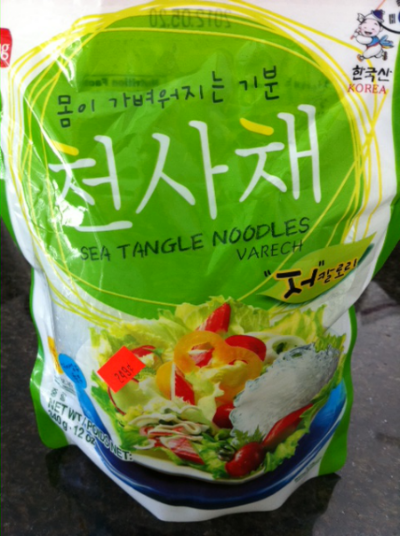
Kelp Noodles from Local Korean Supermarket
The noodles are edible straight from the packet, but are rather crunchy and have no flavor. I washed the noodles in cold water and then squeezed out the excess water. I then added some soy sauce, sesame oil, garlic, and chives, and then mixed it all together in a bowl. I put the bowl into the microwave for 30 seconds on high and poured out any excess liquids afterwards. The noodles were still rather crunchy, but not bad.
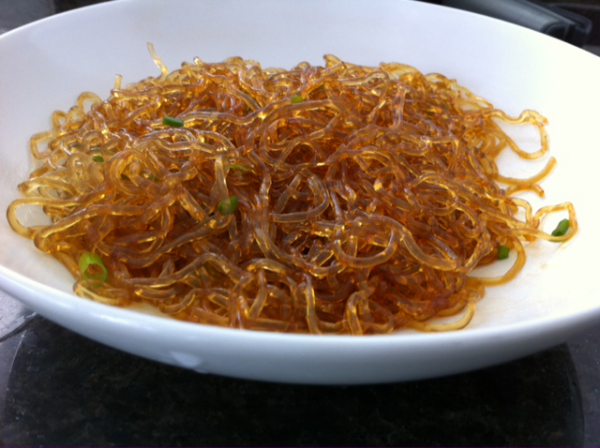
Kelp Noodles Microwaved with Soy Sauce, Sesame Oil, Garlic, and Chives
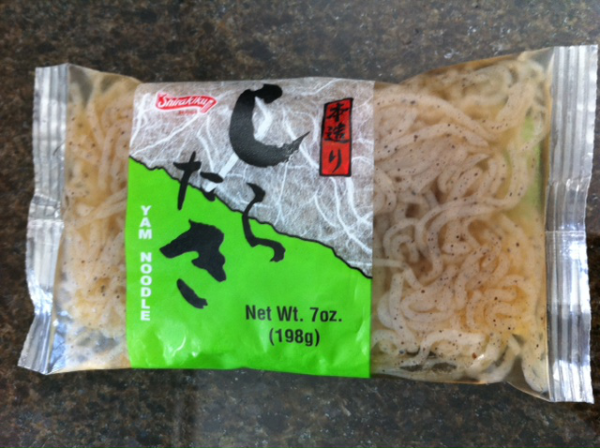
3. Shirataki Noodles (White) I tried these noodles a while ago as Wholefoods sold them and they had gotten a lot of press as a diet food. They’re made from the root of a type of asian yam (sometimes called konjac or elephant yam), but unlike the yams that we’re used to which contain a lot of net carbs, these so called “yam” plants have pretty much all fiber. Each 1 oz packet contains less than 1g of net carbs and 0 calories. The packet pictured below are white Shirataki Noodles (also called Yam Noodles) that contain no tofu or soy. Some manufacturers make a tofu Shirataki noodle, which as you might have guessed contains tofu. Supposedly, the tofu makes the noodles less rubbery, but it also adds some carbs to the noodles.
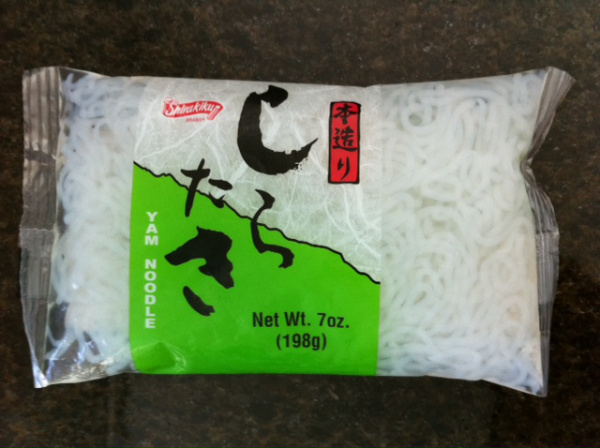
White Yam Noodles
How to cook them? Take them out of the packet and wash them with cold water 3 times. I find the noodles to smell a bit fishy (literally), and so I like to rinse them well. Then place the noodles into the microwave and cook on high for 30 seconds – this helps to get rid of the fishy smell and makes them less rubbery. Rinse again in cold water. Add in soy sauce, sesame oil, garlic, and chives and mix together. Cook again in the microwave on high for 20 seconds. Drain the excess liquid and serve.
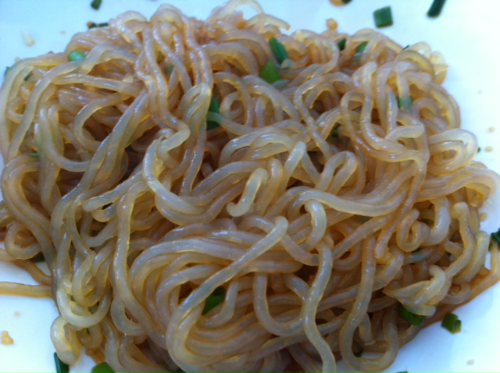
White Yam Noodles Microwaved with Soy Sauce, Sesame Oil, Garlic, and Chives
4. Shirataki Noodles (Brown) These are basically the same as the white shirataki noodles except they have some seaweed food-coloring in them! They taste pretty much the same too and have the same nutritional values – it just adds a bit of variety to our meals.
Brown Yam Noodles
More recipes on how to make delicious low-carb meals with these noodles will follow.
Crave Mashed Potatoes? Try Cauliflower Mash
Need some mash to go with those bangers? I found this great recipe for mashed cauliflower on foodnetwork.com and then modified it a touch to make it more buttery.
Ingredients (makes 4 medium portions)
- 1 medium cauliflower
- 1 tablespoon cream cheese (softened)
- 1/4 teaspoon grated Parmesan
- 1/2 of a small clove of garlic (or 1/2 teaspoon minced garlic) (I made the mistake of putting too much garlic on my first attempt by putting in one large clove of garlic, and it was seriously garlicky!)
- 1/2 teaspoon salt
- pinch of black pepper
- 3 tablespoon unsalted butter (softened)
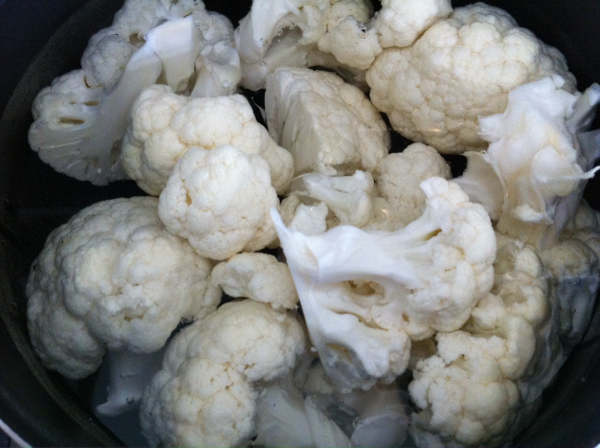
Cauliflower Florets in Boiling Water
- Boil a pot of water.
- Break up the cauliflower into florets and place into the boiling water (see photo above).
- Boil for 8 minutes on high heat (make sure the florets are pretty soft and easy to cut with a fork).
- Drain the cauliflower but do not cool. Instead, dry the florets with some paper towels and place into the food processor.
- Add the cream cheese, grated parmesan cheese, garlic, salt, pepper, and butter into the food processor and blend until it’s pretty smooth (see photo below). This may take a minute or two.
- Ready to serve. You can sprinkle some chives on top to make it look prettier – I mixed it into the mash (see the photo below).
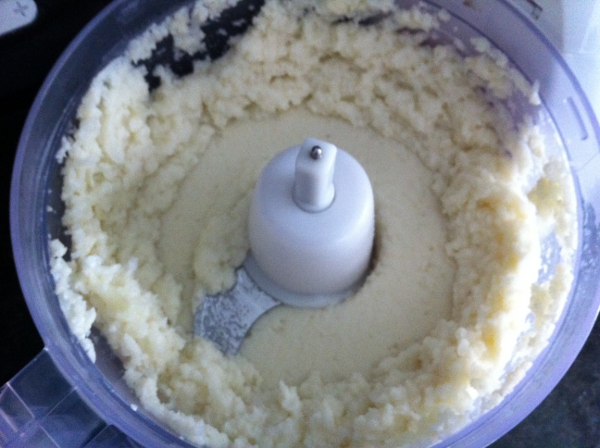
Cauliflower Mash in Food Processor
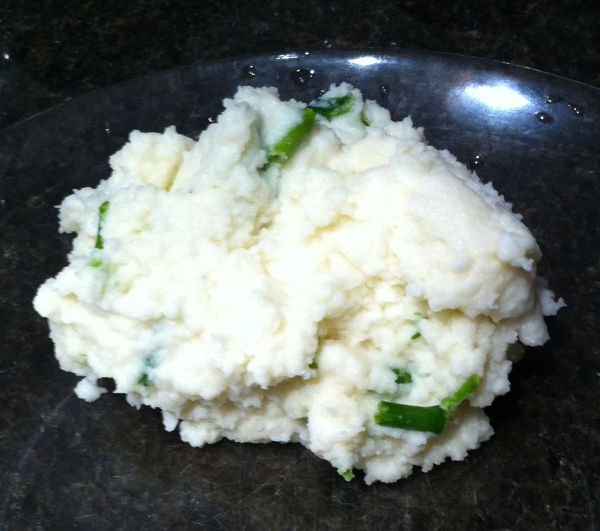
Cauliflower Mash
Faux Fried Rice
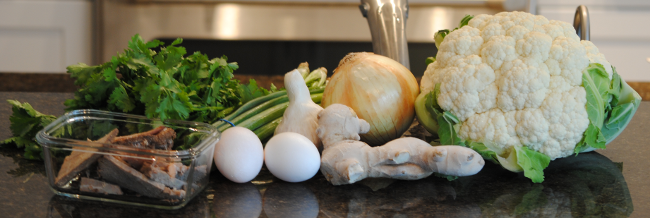 Ingredients for Chinese Faux Fried Rice (One of the Many Faux Rice Variations)
I was very skeptical when I first read about faux fried rice on nomnompaleo, which is a really interesting paleo blog, but it actually tastes amazing and very close to rice. The basis of the recipe is cauliflower chopped up in a food processor to simulate a fake rice look and texture. Personally, I think a more accurate description would be faux cous cous because the cauliflower bits you’re left with are very small. You can add pretty much anything (or nothing) to the chopped cauliflower for your dish (so it can be as simple or as complicated as you want). Below are some recipes I’ve come up with (modifying the basic idea that I got from Nomnompaleo). The first recipe is just a basic faux white rice, and the second is a Chinese fried rice (there’s a Thai version too). Countless other variations are possible!
Basic Faux White Rice (serves 2 adults)
- Half a large cauliflower
- Half a yellow onion
- 2 eggs
- 4 cloves of garlic
- 2 tablespoons of coconut oil (or some other oil or butter)
- Salt to taste
- Chop the cauliflower and onion into small chunks so that it’ll fit into the food processor. Place the chopped cauliflower and onion and the garlic into the food processor with the S-shaped (sabatier) blade and chop until everything is in tiny bits.
- Pour 2 tablespoons of the oil into a pan (any pan will do as long as it’ll fit all the ingredients in).
- Heat the pan on a medium heat.
- After 1 minute, add in all the food processed ingredients. Squeeze out excess liquid (mostly from the onions) if the food processed ingredients seem too soggy.
- Leave the pan with the ingredients in it for 2 minutes. Then crack the two eggs and add them into the pan. Stir the eggs immediately in with the other ingredients so that it doesn’t form large lumps.
- Continue cooking on a medium heat for another 10 minutes stirring every few minutes.
- Add salt to taste.
- Ready to serve. You can have the rice by itself, with some soy sauce, with stir-fried vegetables or meat, or basically with anything you want to have rice with.
Chinese Faux Fried Rice (for Thai Fried Rice, switch the green onions and cilantro for basil)
- Half a large cauliflower
- Half a yellow onion
- 4 green onions (or spring onions or scallions)
- A cup of cilantro leaves (a large handful if you scrunch it up) – try to cut off most of the stalks
- 2 eggs
- 4 cloves of garlic
- Half an inch cube of ginger
- Roast beef chopped into small pieces (I use the slow cooker roast beef because it’s already very flavorful)
- 2 tablespoons of coconut oil (or some other oil or butter)
- Salt and soy sauce to taste
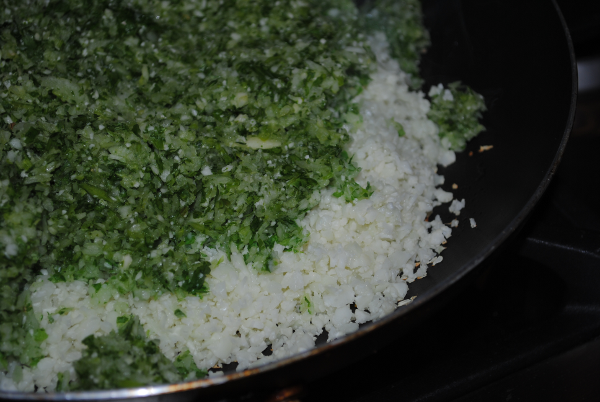 Raw Ingredients in Frying Pan
- Chop the cauliflower, onion, and green onion into small pieces so that it’ll fit into the food processor. Place the chopped cauliflower, onion, and green onions and the garlic and ginger into the food processor with the S-shaped (sabatier) blade chop.
- Pour 2 tablespoons of the oil into a pan (any pan will do as long as it’ll fit all the ingredients in).
- Heat the pan on a medium heat.
- After 1 minute, add in all the food processed ingredients. Squeeze out excess liquid (from the onions and cilantro) if the food processed ingredients seem too soggy.
- Leave the pan with the ingredients in it for 2 minutes. Then crack the two eggs and add them into the pan. Stir the eggs immediately in with the other ingredients so that it doesn’t form large lumps.
- Continue cooking on a medium heat for another 10 minutes stirring every few minutes.
- Add the chopped up roast beef and stir.
- Add salt and soy sauce to taste.
- Ready to serve.
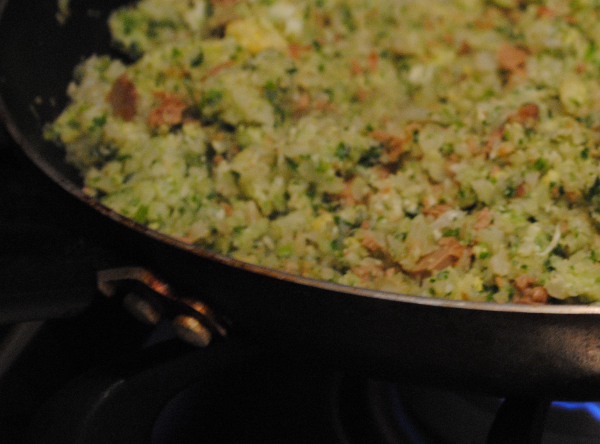 Ready to Serve Chinese Faux Fried Rice

